Difference between revisions of "Run SWAT Model"
From MohidWiki
Davidbrito (talk | contribs) (→Start The Project) |
Davidbrito (talk | contribs) (→Start The Project) |
||
| Line 1: | Line 1: | ||
| − | == | + | ==Create the SWAT Project== |
Run ArcView | Run ArcView | ||
| − | If a Window appears "Welcome to ArcView GIS" | + | If a Window appears "Welcome to ArcView GIS" asking to create a new view, click "Cancel" |
Go to menu "File"->"Extensions" | Go to menu "File"->"Extensions" | ||
| Line 9: | Line 9: | ||
[[Image:Swat_ArcViewExtension.png|425px|thumb|center|ArcView SWAT extension]] | [[Image:Swat_ArcViewExtension.png|425px|thumb|center|ArcView SWAT extension]] | ||
| − | |||
| − | [[Image: | + | Go to Explorer and create a directory for the project (e.g. Aplica\AVSWAT2005\Portugal\Guadiana\BaciaExemplo\CenarioX) |
| + | |||
| + | A new Window appears - SWAT interface. Click on the box "New Project" to create a new project. | ||
| + | |||
| + | Choose the name for the project in the directory you created (e.g. Bacia_crsr) | ||
| + | |||
| + | Go back to Explorer and to your project directory (the just created by the project) and copy the "data" file from \\datacenter ''''FILL THIS''' | ||
| + | |||
| + | A window appears "SWAT - ArcView: DataSets". Choose the data directory just created and named "data". | ||
| + | |||
| + | ==Create the project options text file== | ||
| + | Copy from \\datacenter ''''FILL THIS''' the text file where you will write all the options that you make in this interface. This file is not used by the model, it is only a memo and will be very useful when you have a lot of old simulations and have to understand what options have you chosen and difference betwen them. | ||
| + | |||
| + | Place the file in the ..\watershed\text folder that meanwhile was created by SWAT. | ||
| + | |||
| + | ==Watershed Delineation== | ||
| + | |||
| + | A window appears "Watershed delineation". | ||
| + | |||
| + | [[Image:Swat_WatershedDelin.png|425px|thumb|center|ArcView SWAT watershed delineation]] | ||
| + | |||
| + | In Dem Setup: | ||
| + | |||
| + | Choose the folder icon to open the DEM (digital elevation model) in the folder data\dem | ||
| + | |||
| + | If you do not have yet the DEM go to '''FILL THIS''' | ||
Revision as of 14:58, 17 September 2009
Create the SWAT Project
Run ArcView
If a Window appears "Welcome to ArcView GIS" asking to create a new view, click "Cancel"
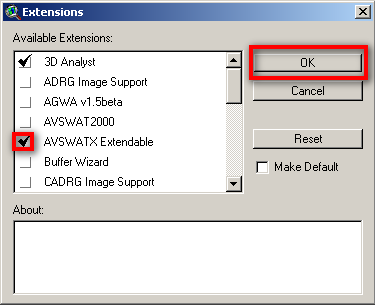
Go to menu "File"->"Extensions"
Click on the check box "AVSWATX extendable" and NEVER click the check box "Make Default"
Go to Explorer and create a directory for the project (e.g. Aplica\AVSWAT2005\Portugal\Guadiana\BaciaExemplo\CenarioX)
A new Window appears - SWAT interface. Click on the box "New Project" to create a new project.
Choose the name for the project in the directory you created (e.g. Bacia_crsr)
Go back to Explorer and to your project directory (the just created by the project) and copy the "data" file from \\datacenter 'FILL THIS
A window appears "SWAT - ArcView: DataSets". Choose the data directory just created and named "data".
Create the project options text file
Copy from \\datacenter 'FILL THIS the text file where you will write all the options that you make in this interface. This file is not used by the model, it is only a memo and will be very useful when you have a lot of old simulations and have to understand what options have you chosen and difference betwen them.
Place the file in the ..\watershed\text folder that meanwhile was created by SWAT.
Watershed Delineation
A window appears "Watershed delineation".
In Dem Setup:
Choose the folder icon to open the DEM (digital elevation model) in the folder data\dem
If you do not have yet the DEM go to FILL THIS

