Run SWAT Model
From MohidWiki
Contents
Create the SWAT Project
Run ArcView
If a Window appears "Welcome to ArcView GIS" asking to create a new view, click "Cancel"
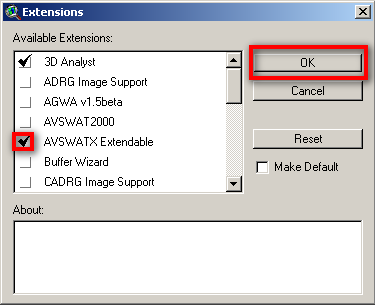
Go to menu "File"->"Extensions"
Click on the check box "AVSWATX extendable" and NEVER click the check box "Make Default"
Go to Explorer and create a directory for the project (e.g. Aplica\AVSWAT2005\Portugal\Guadiana\BaciaExemplo\CenarioX)
A new Window appears - SWAT interface. Click on the box "New Project" to create a new project.
Choose the name for the project in the directory you created (e.g. Bacia_crsr)
Go back to Explorer and to your project directory (the just created by the project) and copy the "data" file from \\datacenter 'FILL THIS
A window appears "SWAT - ArcView: DataSets". Choose the data directory just created and named "data".
Create the project options text file
Copy from \\datacenter 'FILL THIS the text file where you will write all the options that you make in this interface. This file is not used by the model, it is only a memo and will be very useful when you have a lot of old simulations and have to understand what options have you chosen and difference betwen them.
Place the file in the ..\watershed\text folder that meanwhile was created by SWAT.
Watershed Delineation
A window appears "Watershed delineation".
In Dem Setup
Remind to write down relevant information to your memo file. Follow the example file that you copied previously (project options text file)
Click the folder icon to open the DEM (digital elevation model), choose to open from disk and select the DEM in the folder data\dem.
If you do not have yet the DEM go to FILL THIS
Click Properties button
Click Projection button
Message "Undefined Projection". Click "OK"
Message "Do you want to modify your projection?". Click "YES"
Click "Custom Projection" button
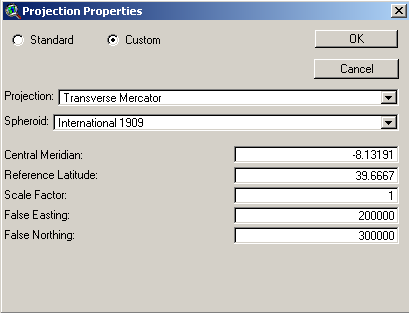
"Projection Properties" window. Select radio buttom "Custom"
On "Projection" choose "Transverse Mercator"
On "Spheroid" choose "Internation 1909"
Write the coordinate settings in the next picture so that the final it should look like this:
Click "OK" twice.
Back to "Dem Setup" click "Apply" button
Message "Do you want the edge cells to flow inside?" Choose "No"
Message "End of processing". Click "OK"
In Stream Definition
Remind to write down relevant information to your memo file. Follow the example file that you copied previously (project options text file)
Choose the treshold area for the consideration of a stream line. The value depends on the number of subsbasins generated. As you only will know the exact number of subbasins after completing the Watershed Delineation step, as a first value put in the recommended. Then, in the end of the Watershed Delineation step you should have around 50-80 subbasins; if you have less you shoul decrease the treshold area, if you have more, you should increase.
Click "Apply"
When the process is finished, streams will show up in the background
Outlet and Inlet Definition
Remind to write down relevant information to your memo file. Follow the example file that you copied previously (project options text file)
Outlets are places where the model will produce outputs (flow, concentrations), so you should have an outlet in the reservoir wall and in the river monitoring points from INAG (to validate model results)
If there is not already an outlet where you whish to have one, add the outlets leaving the radio button on "Outlet" and clicking on "Add". Choose where to add the point. Hint: Use the reservoir shape to know where to locate the downstream watershed outlet (at the reservoir wall so that all drainage area is considered).
After adding all needed outlets, select the outlet which is the watershed outlet (downstream outlet), clicking first on "Select button" and then pointing at the outlet (or selecting an area where that is the only outlet inside).
Click "yes" to confirm that you selected one outlet.
The model generates the watershed and subbasins, then click "Apply" so the model computes the parameters for each subbasin generated.
Message window saying that the computation was completed. Click "OK"
Land Use and Soil Definition
Add to the ArcView the shapes with the soil data (in data/soil) and land use (in data/uso_solo)
In Menu "AVSWAT" -> "Land Use and Soil Definition". Note that the previous step (watershed delineation) is in thys menu and that the next step is unavailable yet.
In "Land Use Data Layer"
Click the folder icon to load the land use shape.
Choose option: Select shape from watershed view
Choose option: Format: shape
Select shape: Corine2000
Select the field with the land use code: code_00
Message saying that shape was sucessfully clipped and to reclassify. Click "OK"
Now we need to translate the land use codes to a land use that SWAT understands. That is done by a table with correspondences. Click "Lookup Table Grid..." button.
Select: "User Table"
Select: dbf file
Browse for the file lucnew_wwater.dbf in data/uso_solo
Now land uses in swat language appear. Check that all the values in the table have an "Land Use SWAT" code.
Click Reclassify
In "Soil Data Layer"
Click the folder icon to load the soil shape.
Choose option: Select shape from watershed view
Choose option: Format: shape
Select shape: Solo_eu_Portugal
Select the field with the land use code: sltxcl
Message saying that shape was sucessfully clipped and to reclassify. Click "OK"
Now we need to translate the land use codes to a land use that SWAT understands. That is done by a table with correspondences. Click "Lookup Table Grid..." button.
Select: dbf file
Browse for the file soil_crsr.dbf in data/solo
Now soil types in swat language appear. Check that all the values in the table have an "Name" code.
Click Reclassify
Click "Overlay".


